Showing posts with label kitchen. Show all posts

November 16, 2011

DSC_1101

Remember back when Dani did her (still unfinished!) house tour?  She mentioned this ugly 1980’s gold chandelier on her list of still-to-change in the kitchen.


It’s really the last remnant of the old kitchen.


Ugh.  I cannot believe that is the same room. 


So.  Anyway.  I went to Home Depot and they had a clearance table for lighting.  Clearance tables at Homies are both beautiful and deadly at the same time.  It’s like one of those mosquito zapper things. 


There on the table was a light that we had both really liked when we saw it on display a month or two earlier.  At the time, it was retailing for over $200.00.  When I saw it’s new price, I snapped a picture of it and sent it to Dani.  Her reaction was.. well.. she told me to geri t, and I believe she wanted me to expedite that process.


text_convo


Do you see that price sticker?!  That’s like a billion percent off.  Once I geri t’d it home, we hung it up, and with that, we have now purged the last of the old kitchen from the house. 


DSC_1102


I left some extra chain because the box for the light isn’t centered in the room, and I may put a little dangle in the chain and attach it to the ceiling so that the light will be centered.


We both think that this new light complements the pendant lights I made


What do you think?

Read More

November 1, 2011

Ok… just a quick post to get this ball rolling again.  It’s been a busy fall over here.  We have the ongoing flooring project at home, which I’ll update everyone on at a later date.  The big news, though, is this: Dani and I have recently acquired another house full of projects. 

Let's just let that sink in for minute.

We’re renovating a house in Pikesville, MD, in order to rent it out.  Because, hey.. one house full of projects isn't enough!  It hasn’t had many updates since being built in 1956ish, and we’re on an abbreviated time scale trying to get things done over there.  The process of acquiring it and beginning demo has taken most of my free time of late, hence the lack of any new content, here.

DSC_1079

DSC_1068

I’ve got some early demo photos to share, though!  Everybody loves demo.

DSC_1066

DSC_1065

Here we have the kitchen; early-demo.  The cabinets are old-school metal ones.  The floor has 3 layers, and I was incredibly nervous of floor-rot underneath it.  It turned out to be in great shape, though.

DSC_1069
DSC_1074

DSC_1075

And here is the pre and post-demo of the utility room.  Our plans, here, are to update the electrical and plumbing, new walls, cabinets against the back wall, and something neat for the ceiling….

DSC_1076

We’re removing these ceiling joists and building a new bump-out wall against the exterior of the original house.  This will go all the way up, and tie the utility room addition to the exterior of the house to recoup the strength we’re losing by removing these ceiling joists.  Then we’ll have a nice tall ceiling that will give this space some breathing room and make it feel bigger.

DSC_1077

This is where the new bumped out wall will go. 

DSC_1080

DSC_1081

And lastly, the partly-demo’d kitchen.  A long way to go in these two rooms, but it is where the bulk of the work is happening for right now.  Over the next couple of months I’ll be redoing the electrical and plumbing, walls, ceilings, cabinets, lights, sinks, appliances… this all feels so familiar!
Read More

August 21, 2011

DSC_0520 (2)


When we redid the kitchen a couple of winters back, we replaced all the appliances except for the dishwasher.  It was only 4 or so years old, the quality was on the upper side of medium, and it worked well.  It didn’t match the rest of the appliances, but it didn’t look bad, either.  The other day, we opened it after a load was done, and the dishes were pretty grimy, still, and there was dirty, standing water at the bottom of it.  I tried to force it to enter the drain mode, but it wouldn’t power on.


When I was installing the baseboard, I had foreseen that a difficulty with the dishwasher might arise, and had create a removable panel of baseboard for in front of it.  I popped this out, and using my awesome non-contact voltage tester tool (yellow pencil-shaped thing in the picture below), I verified that the dishwasher was, in fact, getting power.  About 30 mins later, I’d narrowed the problem down to having something to do with the control panel.  After opening it up and looking for any obvious shorts or loose wires, I did a price-check on a replacement control panel.  It’s a bit shy of $200.  We decided that it wasn’t worth repairing, and off I went to the nearest Sears Scratch-and-Dent center.

DSC_0689DSC_0690


There, I picked up an Electrolux model that was a customer return.  It matches our other stainless steel appliances and has all of the options we wanted.  It retails at $1100, but I walked out with it for $515.  The only negative is that I failed in something I usually excel at.  Dani would say I excel at this to the point of ad nauseam.  Research.  I should have done more.  This model has a lot of bad reviews on Amazon.  I’m just crossing my fingers that we don’t have to join their ranks.  I was in a rush, though, and the price was good.  We had 5 house guests this weekend… the dishes were piling up fast, and hand-washing was becoming untenable. 


Before I removed the old one, I turned off the dedicated breaker for it and disconnected the power feed in the electric box on the dishwasher.  After turning off the water feed to it, I then had the joy of sucking out all the nasty water still inside with my ever-venerable shop-vac.  In my last entry here at the ol’ blog, I mentioned that I had inadvertently caused ashes from the fireplace to spew skyward and cover most of the surfaces in the family room, causing cleanup to take far too long.  Knowing I had a shop-vac full of ash, I emptied it outside and removed the filter before sucking up water.  Apparently I wasn’t thorough enough, though, because as soon as I turned it on, ash blew out of the thing all over the kitchen floor. 


Pain. In. The. Ash.


You may have noticed in the image above of the old dishwasher that it is sitting up on some 2x4s.  This is because all of the cabinets in our new kitchen sit 3” off the ground.  I talked about why we did this when I installed them.  Because a dishwasher has feet at the front and the back, it's kind of hard to get one pushed in correctly when the surface isn’t flat.  I was having trouble getting the new one in, so I quickly whipped up some 2-by-4 base-extensions to sit perpendicular to the existing cabinet base.  It made the whole process much easier.  The white pex visible in the picture is the water feed for the as-of-yet-unpurchased-or-installed pot filler above the stove.


DSC_0700


With the new bases in place, I wired in the new dishwasher and connected the water feed and the drain line, then pushed it in.


DSC_0699


It’s a much more pleasant experience loading and unloading a dishwasher that sits higher off of the ground.  I cannot over-recommend this to fellow tall people.


DSC_0702


So the new dishwasher is in place.  It’s Dani’s job to get the sticker residue off the front and get it all nice and shiny, and I have still have to reinstall the baseboard panel.  The first test load worked well, so here’s hoping our luck holds.

Read More

August 8, 2011

DSC_0518


The exposed ends of the cabinets and of the island were always intended to be stone veneer.  I’ve priced out the cost for the amount of stone I would need and it’s about $500.00.  There always seems to be something better I can spend 500 bones on. 


Last Fall, Dani’s employer decided that she no longer wanted a large display unit in the salon.  She said if I would get it out of there, I could have it.  The unit was made entirely of reclaimed barn wood, so I jumped at the chance to snag it.  I disassembled it and brought it home, and stacked it under the car port to keep the weather off of it.  I figured since it’s super-old barn wood, it would do just fine.  That did not turn out to be the case.  When I moved it earlier this month, this is what I found:


DSC_0525


My awesome barn wood had been eaten.  Pretty thoroughly.  About 30% of the surface area of all the wood had been badly marred by some kind of beetle, I think.  I found oblong-shaped empty eggs in these holes.  I had intended to use this wood to make some really nice furniture for the living room, but that option was taken away.  Dani had a bright, idea, though.  Maybe this would work for the ends of the cabinets in the kitchen.  So here is my usable barnwood.


DSC_0520


Although I couldn’t find a single bug anywhere on or in the wood, I bug-bombed it anyway.  Then I used my compressor to blow out any remnants of anything that might be in those holes. 


After a quick photoshop to see how it would look in the kitchen, I decided to give it a go.  I cut some pieces and dry-fit them, and I was liking it so far.


 DSC_0519


So I cut the rest of the pieces, spray a few coats of polyurethane over them, and used my nail gun to put them in.  Here’s the results.


DSC_0534  DSC_0531


DSC_0533


I can’t say that I’m head-over-heels in love with it, but I do really like it.  It fits the rustic motif and, here’s the best part, it was free.  It cost me zero dollars and about 3 hours time to cut, clear-coat, and install.


One more thing off the list for the not-yet-done-kitchen.

Read More

February 21, 2011

Ok, we’re continuing the tour of the first floor.  If you haven’t already, check out the first in my house tour series; Episode IV: A New Home.

Sorry this post was a little longer coming than I originally suggested, but this week the handy hubby decided to start a project that we have no time, money, or patience for, and is in no way related to our home.  It involved buying a well-used (i.e. P.O.S) VW Beetle.  I’ll let him tell you the rest of that story.  So that took up a bit of our time, recently. 

But back to the house. Today, we’ll finish the first floor with these rooms:
  • Kitchen
  • Sunroom
  • Office

The Kitchen

This is the one room in the house that is definitely an after picture.  As you know from previous posts this room has been gutted to the studs and rebuilt.  Having this room almost completed has actually changed my opinion of the entire house.  Believe it or not, I did not love this house when we bought it.  However, Kevin did, and I was tired of looking, and I have to admit it met all of our requirements.  So why was I not in love?  I couldn’t tell you.  I just didn’t get that warm fuzzy feeling. 

But now… how could you not get warm and fuzzy about this!
069

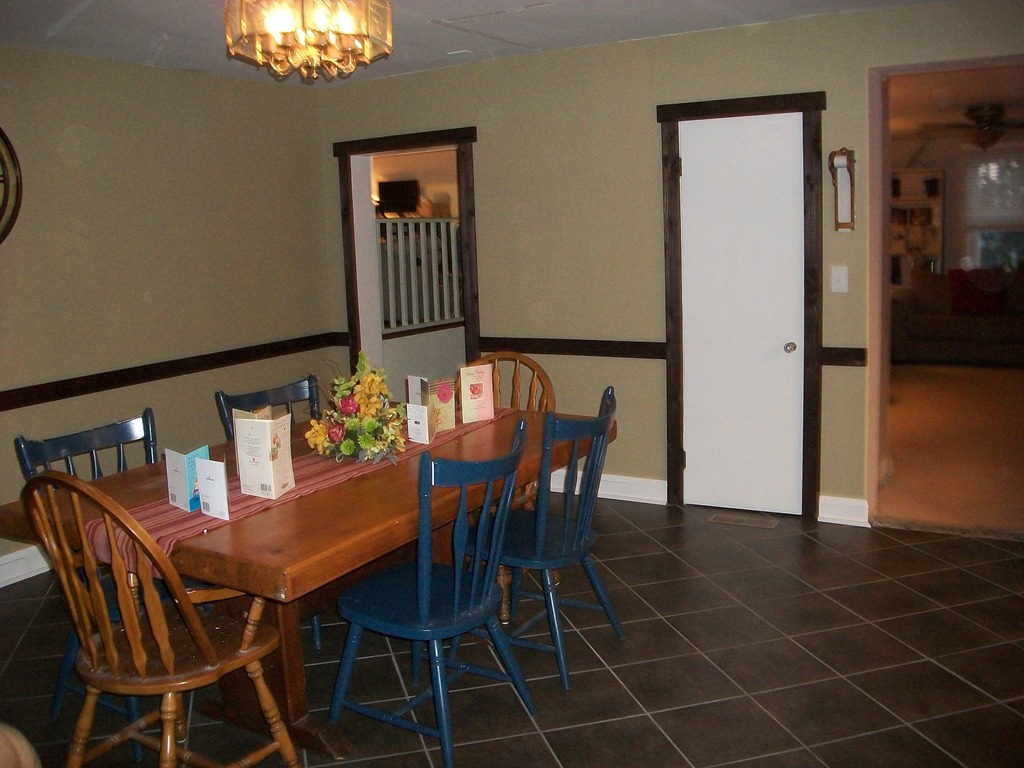
The doorway in the left of this next pic leads to the sunroom.  The window overlooks the drive way, which is why, as Willow is demonstrating, it is one of the dog’s favorite spots.  The girls frequent the spot to growl at the wind or try to scare away the mailman. 

071

The doorway in the corner leads to the office.  Things that will eventually change is the ugly brass 1980-something chandelier.   Also the dining table that I inherited from my parents (and is a favorite from my childhood) will move into the sunroom to go with the bench seating.  The mismatched chairs will go in a yard sale.  The color of the room is Mochachino by Behr.

072


The Sunroom

This is easily my favorite room in the house.  It is very poorly insulated and three of the walls are old crappy windows so its not very pleasant to be in during winter.  In the summer, though, it is a whole different story.  I throw all the windows open and stretch out with a book; all the pleasures of the outdoors with all the luxuries of the indoors.  And no pesky bugs!  Anyway, you get how a sunroom works; I digress.
The room was previously the yellowy/off-white color you see on the doors.  Recently I painted the trim an ultra bright white and the walls are Secret Passage by Olympic.  We are going to replace the doors and strip the paint off the brick wall.


074

The bench seating that Kevin is working on building is going where the TV cabinet is, and the cabinet is being sold.  Also, we would like to replace the ceiling that looks like aluminum siding with natural wood so it has more of a porch feel.  Kevin wants new floors in here, and I admit it would look better, but the dark-color, rough berber carpet is perfect for the dogs coming in and out.  

Can you tell who's the Jedi and who's the Sith? 
075

Here’s a hint.


And the answer is:
danes_jedi

The Office

The original owner of this house built this room above the garage and originally had only an outside entrance.  It was his home-office for his building company.  The streets parallel and perpendicular to ours are named after him, and most of the houses closest to us were built by him.

For us, the room houses our computers (i.e. blogging central)  and my home salon area for family members I love enough to work on my days off for.   Koa frequently comes in here to nudge Kevin with her nose for no other reason then wanting attention.  Kevin acts like it bothers him but secretly he wants the attention too.  You can see the paint swatches on the corner of the desk; they are evidence of another project coming. 

099

There is a closet next to the window that Kevin wants to cut into to make a built-in shelf.  It will mimic the line of the ceiling on the other side.  Then, the salon chair will swing around and the mirror will go on the wall where the current cubby shelves are.  The bachelor couch will go on craigslist and I will start hunting for some armchairs. 

100

And that concludes the first floor of the house!  We’ve got one more post yet in this series, which will cover the second floor.  I’ll be back later this week eventually with the conclusion:   Episode VI: Return of the Eighties.

See you then!
Read More

February 6, 2011

I don’t really like to curse.  I can usually avoid it.  Today was not one of those days.  I hate hate hate replacing old 3-way switches.  It took me 2 hours to figure out how to do it right.


image

image


image


I’m no dummy, but the fact that the “hot” wire can also be the wire that signals the other switch is still very confusing to me.  I reread what I just wrote and it still doesn’t make sense.  The blue diagram actually helped me figure it out, and after 37 trips up and down the steps to go flip the breaker, I finally got it installed.  Two hours later.  [sigh].


So here’s some shots of the installed outlets, switches, and covers.


IMG_1330  IMG_1332IMG_1331


You might notice the messed up paint under the one switch.  This, people, is why you never:

  1. Put wallpaper over a switch
  2. Paint over the wallpaper


I have my previous owners to thank for that one.  Oh well, more painting to do.


Now that I’ve wrapped up these loose ends, it’s on to new projects!  Stay tuned.

Read More

February 1, 2011

I am so excited right now.  I’ve been thinking about doing this little project for an entire year and have only just now actually done it.  It was made possible by my darling wife’s thoughtful Christmas gift.

IMG_1247

She got me a three-pack of Dremel tools! 
  • Dremel Multimax
  • Dremel Trio
  • Dremel Rotary Tool

I’ve already been putting these suckers to use all over the house. 
Today’s project, though, used the Dremel Trio.  That’s this one.

IMG_1287

I bought a metal plunge-cut bit for it and climbed into the kitchen closet.  First, I used the lid off the dog treat container to trace an outline on the target surface.  Then, using the plunge-cut bit I worked my way around the outline to cut a nearly-perfect circle opening.

IMG_1286 IMG_1288

Why am I so excited about this?  Because I am so done with stepping on wet wash rags on the basement steps and having to change my socks.  When the kitchen rag or towel becomes dirty, stinky, overly stiff, or some combination of the above, we open the door to the basement and throw it down the steps.  And then, the next time someone goes down there, they either see it and move it next to the washer, or they don’t, and they get a wet sock.  That little opening, my friends, opens to the laundry chute from the upstairs bathroom.  Now, we can open the kitchen closet and make a deposit directly above the washing machine.  Oh joyous day!  No longer shall I angrily stalk up the two flights of stairs and hunt for another pair of socks.  My wife isn’t nearly as excited.  I think she’s broken.

That is all.
Read More
Powered by Blogger.