Showing posts with label lighting. Show all posts

November 16, 2011

DSC_1101

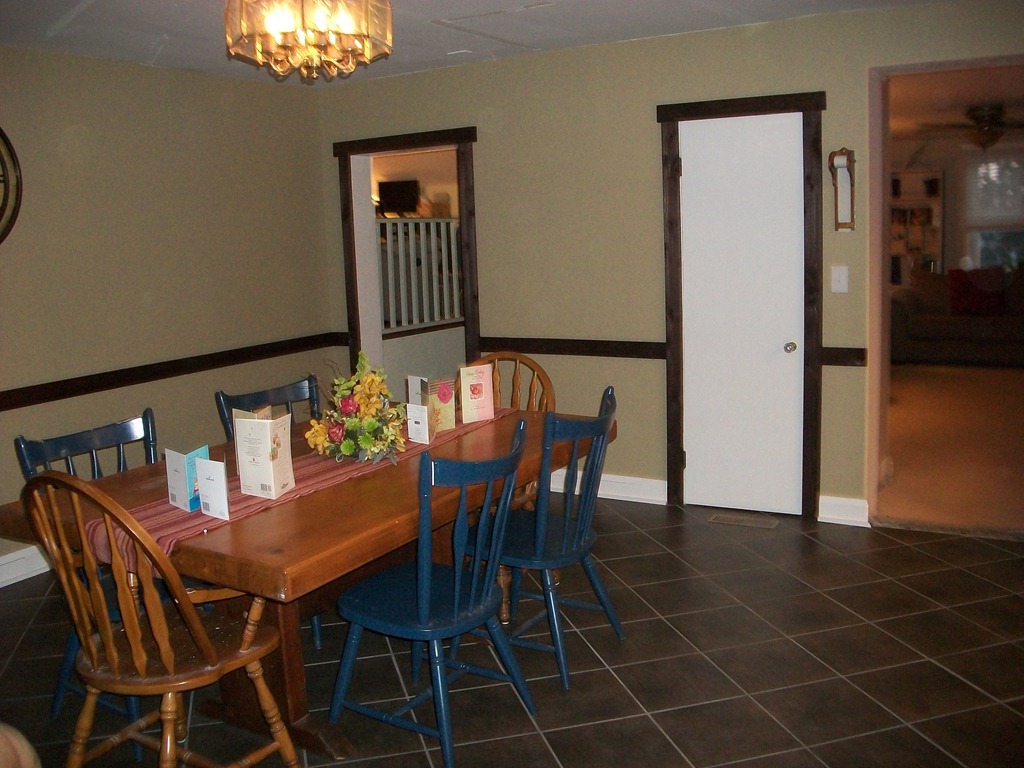
Remember back when Dani did her (still unfinished!) house tour?  She mentioned this ugly 1980’s gold chandelier on her list of still-to-change in the kitchen.


It’s really the last remnant of the old kitchen.


Ugh.  I cannot believe that is the same room. 


So.  Anyway.  I went to Home Depot and they had a clearance table for lighting.  Clearance tables at Homies are both beautiful and deadly at the same time.  It’s like one of those mosquito zapper things. 


There on the table was a light that we had both really liked when we saw it on display a month or two earlier.  At the time, it was retailing for over $200.00.  When I saw it’s new price, I snapped a picture of it and sent it to Dani.  Her reaction was.. well.. she told me to geri t, and I believe she wanted me to expedite that process.


text_convo


Do you see that price sticker?!  That’s like a billion percent off.  Once I geri t’d it home, we hung it up, and with that, we have now purged the last of the old kitchen from the house. 


DSC_1102


I left some extra chain because the box for the light isn’t centered in the room, and I may put a little dangle in the chain and attach it to the ceiling so that the light will be centered.


We both think that this new light complements the pendant lights I made. 


What do you think?

Read More

August 27, 2011


So as many of you know the Mid-Atlantic region has recently been affected by some unusual natural events.  Last week was The Earthquake of 2011 as I am now referring to it.  Last Tuesday Virginia experienced a 5.8 earthquake that was felt as far north as New York.  I’ve lived in Maryland my whole life and have never felt an earthquake, so when it happened, I was confused for a solid 5 minutes.  I couldn’t understand how we could have bought a house that was so structurally unsound that it was now falling down around me.  After I finished processing what had happened I realized, “I know what this is! I’ve read about it!”  Also, I checked Facebook.  Naturally there were 20 posts from my friends and family all reporting that what we felt was indeed an earthquake and not my house crumbling at the foundation.  The devastation was horrific.


image


That’s not really my joke; I stole it from the intertubes.


So anyway, after that big event came and went the talk turned from The Earthquake of 2011 to the approach of Hurricane Irene.  What do Baltimorons do when a big storm is heading our way?  Buy all the milk, bread and TP we can fit in our cars.  Being that Kevin and I are on the Medifast diet right now, we had no need for additional food and instead we actually did something useful.  I should say Kevin did something useful. He brought our cars and trash cans into the garages, secured our lawn furniture, and emptied the trailer of debris that could become airborne.  Twenty minutes later he was out of things to do, so we turned our attentions to inside the house, and this is what we got done!


We moved our furniture in the Kitchen to protect it from the windows being blown out. 


DSC_0532


Sike!  We moved it so we could do this!  We ripped out the carpet and padding in the living room in preparation for the new hardwood flooring.   Kevin’s been gradually removing the many layers of flooring across the main floor of the house.   We still have to take up at least 2 more layers in some sections.


DSC_0527


After a trip to the dump, I started cleaning up the sunroom while Kevin took down the hideous non-functioning fan/light.  When you turn it on, it just buzzes.


DSC_0523


I wasn’t lying, that thing is ugly right?


DSC_0524


Then, he replaced it with this simple, beautiful, functional new one that I bought for us.


DSC_0525      DSC_0526


He also replaced the missing latches on the storage doors in the office, as well as replacing 2 outlets that have been unusable and without covers for months.


DSC_0528      DSC_0529


What did I do other then take pictures while all this was going on you might ask…


I made delicious pumpkin spiced chocolate chip pancakes for lunch.  We are allowed to eat them on our diet, believe it or not. 


DSC_0531


This is what our girls though of all the activity and the impending storm.

DSC_0530


So there you have it.  A rainy day of impending doom well-spent. 


Storm update: its been gently raining for about an hour with no gusty wind.  If it keeps up like this, maybe you wont be seeing a post about the tree that fell on our house.

Read More

January 11, 2011

We’ve had our eye out for some nice pendant lights for the kitchen island for almost a year, now.  The thrifty dutch blood won't allow me to spend big money on something that is such a simple thing.  Light fixtures are not complicated!

We’ve seen some that we’ve liked in stores, but not exactly what we were looking for.  I found some online that I liked, but they were hundreds of dollars.  To help achieve the rustic themed kitchen we are going for, we want lanterns. 

I found this one online here and really liked it, but the cost barrier rises up and slaps me in the face.  So, I decided to make some.

I was at Lowes a few days ago, and saw these on sale for about 15 bucks.

IMG_1193   IMG_1194


Perfect?  No.  But they’ll do.    I disassembled one to see what I had to work with, here.

IMG_1195

That metal rectangle is the back plate; the remaining 3 sides are glass.  The arms on the lantern come off, also.  This looked like it could work.  First, I needed to rewire the socket so the wires came out the top of the lantern instead of the side. 

IMG_1196   IMG_1197

Looking inside the socket, there are 2 screws holding on the metal flange on the back.  I removed them, took off the flange, passed the wires through the 1/8th inch threaded thing that I don’t know the name of but there’s a picture of it below, and reassembled.

IMG_1198

IMG_1199

I then reassembled the light, leaving out the metal back-panel.  Here’s how it looked at that point. 

IMG_1202

I then realized that the provided wiring wasn’t going to work, because my wiring was going to be visible and wrapped around a chain, so I took it back apart and rewired it with some lamp cord, which is readily available at any home improvement store.  I also drilled a hole through the loop top piece with my hammer drill.  Here’s how it looked after the rewire and putting the loop piece back on.

IMG_1208

Be sure to keep track of which side of the lamp cord is hot.  I did this by trimming the hot side so that when I went to wire it into the ceiling, hot would be a little shorter.
Next up was the ceiling plate.  I was able to use the wall-mounting portion of the light itself that I removed earlier.  This part is pretty self-explanatory, but here’s a couple pictures.

IMG_1203  IMG_1204

After that, I wrapped the cord through a length of black chain and proudly showed my work to the wife.  She didn’t like the chain.  So, back to the store I went and wandered around aimlessly looking for inspiration for about an hour before settling on something.  I bought a couple 3ft sections of 1/4in copper tubing, like what would be used for small plumbing jobs.  I also bought some compression fittings that would allow me to go from the copper to the 1/8in threaded nipple doo-dad pictured earlier.  The 1/4in copper needs a 3/8in compression fitting.  I bought four 3/8in by 1/4in ones; one for each end of each tube.  I also bought two 1/4in by 1/8in bushings that are needed to allow the socket inside the lamp to thread into the copper.
Since everything is hollow, I can now pass the lamp cord right through the middle of them.  Here’s how attempt number 1 looked.

IMG_1209

Getting closer.  When I made the second one, I was able to reduce the visibility of some of the brass by hiding it inside the fixture.  I went back and did the same to the first one. Here’s how the both of them look right now.

IMG_1221

Pay no attention to the still-unfinished range hood back there.

I ended up buying another set of the lights because I wanted some spare parts and I needed some of the glass inserts to fill in the 4th side of these ones (remember that they were actually wall-mounted lights to start, so only 3 sides had glass).  Even after buying a second set of lights, the whole project still came in under 50 bucks.  Not too shabby for some decent-looking pendant lights.

So if you've got the parts, everything is disassembled, and you've rewired your socket, here's the assembly steps:
  1. Widen the holes in the top of the lantern and the wall (now ceiling) plate to accept a 3/8in nipple.
  2. Thread the bushing into the compression fitting, then put the threaded part of the fitting through the lantern top.  Insert the copper into the compression fitting, and thread onto what should be sticking out the top of the lantern.  Make this as tight as possible.  A vice helps out here.
  3. Do the same thing to the mounting side, now, but minus the bushing (it's not needed here).
  4. You should now have your pendant sans light socket.  Feed the wire into the opening in the bushing in the inside of the lantern until it pops out of the ceiling plate.  Pull the rest through, and then thread the socket into the bushing.
  5. Reassemble the rest of the lantern, insert glass, etc, and you're good to go.

I’m planning on buying some kind of spray product to smoke the glass with, as they don’t offer much spot-lighting as they are now.  I’ll post some shots after I do that.


So how about it?  Any opinions on how they turned out?
Read More
Powered by Blogger.