Showing posts with label wife. Show all posts

February 13, 2011

Hey guys!  “Darling wife” Dani here to give you a tour of the house.  I figured this would be a good introduction to the world of blogging for me and a good introduction to me for you, because this tour will take a few posts.  Also, I was thinking this way, when Kev writes about a project in the fill-in-the-blank room, you can picture exactly what's going on. 

Most rooms are in a “before” state, here.  While many of them have a fresh coat of paint or some other small projects completed, we’ve a long way to go, yet.

image

This is what the front of the house looked like the day we moved in. It no longer has that weird deck and wheelchair lift.  Oh, and those bushes are coming out this spring whether Kevin likes it or not.

Kevin and I often joke about what we would name our property if it were an estate and not simply a house.  Names like “the Sanctuary” or “Misty Farms” don’t quite fit.   Since we are on a rather large hill, Kevin likes ‘Mount Olympus‘ and likes to imagine himself Zeus.  For now, I’m just going to go with…

Welcome to our Home.


Today, I’ll take you through these rooms:
  • Family Room
  • Living Room
  • Half Bathroom


The Family Room

When you walk in the front door, you’re facing the stairs to the second floor.  The main floor is split in two by the staircase; with  a living room on each side.   This first room we call the Family Room because it is the more casual of the two and also has the TV.  I wanted really simple paint colors in here, so we went with Belgian Sweet Chocolate by Behr on one wall and Classic Taupe by Behr on the rest of them.  The next project we are planning in this room is hardwood floors.  Then, I’ll get to go crazy picking out colorful furniture and getting rid of some of our early-marriage Ikea pieces.  

051

068


The Living Room

On the other side of the stairs is the Living Room, which still gets confusing so sometimes it’s called the fireplace room or, if Chicago relatives are in, the “frunchroom” (don’t ask me, you have to be from the midwest to get it).  After stripping the paint from the fireplace, the exposed brick and stained wood trim felt very colonial to me, so we went with colors that continued that feel.  Silent Tide is on the wall with the fireplace, and the other walls are Artic Ocean; both by Behr.

064

065

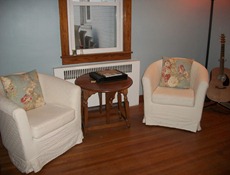
This room is a total hodge podge collection of furniture.  Most items I bought very spur-of-the-moment with the thought, “I’m tired of the room being empty.” or, “ I just want something to sit on by the fireplace.” Both love seats were a Craigslist purchase and the arm chairs were 50 bucks for the pair at goodwill (and they had slipcovers so they were super easy to clean). The rug was a floor model at Home Depot and was discontinued, so I got it for super cheap (50 bucks!  I just have to figure out how to get the sticker off). 

067
  066


The Half Bathroom

This is the half-bath on the first floor.  The paint color is Cherry Cobbler by Behr.  For such a small room, the painting took a long time.  I painted on the matte first, then measured out and taped the diamonds onto the wall, and finally went back and filled in the diamonds with the glossy paint.  Now that I see the final result, I think it was definitely worth all the effort.
 089

Later this week, look for my next post, Episode V: Great Danes Attack, in which Koa and Willow adventure through the rest of the first floor.

What do you think of my first post? 

What would you name your estate if you had one?
Read More

February 8, 2011

As I mentioned in my last post, I’ve been tying up some loose ends in the kitchen recently, which has freed me to start a new project.  My wife, Dani, has asked me to make a corner storage bench for the sunroom as a birthday present to her.  This is a bit of a sneaky move on her part, because she’s wanted one of these for a while, but by asking for it as a birthday gift (admittedly a belated one) she’s managed to bump it to the top of the projects list.  She’s a wily one.


She recently repainted the sunroom, which I think she’s going to do a post about.  We’d both like to see the room put to use other than as a temporary kitchen or a tool storage area.  The room is a bit awkward, because it serves as the primary entrance to our house, but it’s supposed to be a relaxing room. 


We’ve decided to put a rather large corner storage bench in the…well..the corner.  We think it will look great, and it will be very functional for things like parties and holiday dinners.


IMG_1333


That’s the corner we’ll be putting it in.  The room is in a state of disarray as it’s just been painted.  If you’re quick enough to notice that there is a chainsaw at the door and snow on the ground outside, it’s because we lost some branches from the recent snow storm, and I need to go out there and take care of it.  I placed the saw there this morning hoping I’d be motivated to do so…. yeah, not so much.


I’ve been playing with Google SketchUp recently.  It’s a very nice 3d modeling tool for designing just about anything; and it’s free.  It has a bit of an initial learning curve, but after I got the hang of it I could do some pretty cool things.  I used it to design the bench seat.  Here’s the design as it exists right now.


image


image


The higher end-piece there has cubbies for shoe storage.  If you look closely at the first picture, you can see that the far left end piece has a notch in it.  That’s to accommodate the baseboard heater that you can see in the picture of the corner we will be putting this in.


This past weekend, I went to Home Depot and dropped a lot of money for the supplies and tools that I needed to build this thing.  Probably about the same amount of money it would have cost to buy one from the Amish Market, but at least I’ll have the tools and learning experience to take on to my next project.


So hopefully sometime this week I’ll get started on this.  I need to sit down and bust through our taxes first, though.

Read More

February 1, 2011

I am so excited right now.  I’ve been thinking about doing this little project for an entire year and have only just now actually done it.  It was made possible by my darling wife’s thoughtful Christmas gift.

IMG_1247

She got me a three-pack of Dremel tools! 
  • Dremel Multimax
  • Dremel Trio
  • Dremel Rotary Tool

I’ve already been putting these suckers to use all over the house. 
Today’s project, though, used the Dremel Trio.  That’s this one.

IMG_1287

I bought a metal plunge-cut bit for it and climbed into the kitchen closet.  First, I used the lid off the dog treat container to trace an outline on the target surface.  Then, using the plunge-cut bit I worked my way around the outline to cut a nearly-perfect circle opening.

IMG_1286 IMG_1288

Why am I so excited about this?  Because I am so done with stepping on wet wash rags on the basement steps and having to change my socks.  When the kitchen rag or towel becomes dirty, stinky, overly stiff, or some combination of the above, we open the door to the basement and throw it down the steps.  And then, the next time someone goes down there, they either see it and move it next to the washer, or they don’t, and they get a wet sock.  That little opening, my friends, opens to the laundry chute from the upstairs bathroom.  Now, we can open the kitchen closet and make a deposit directly above the washing machine.  Oh joyous day!  No longer shall I angrily stalk up the two flights of stairs and hunt for another pair of socks.  My wife isn’t nearly as excited.  I think she’s broken.

That is all.
Read More

January 30, 2011

My wife is a hair stylist at a very nice salon nearby.  She and a client were discussing their love of consignment store shopping when the client  mentioned a place she recently found that is both a consignment shop and an auction house.  It turns out to be just a couple of miles from the house, so we checked it out.  I noticed a number of tools that would be up for auction over the weekend and so on Saturday, I went.  It was my first auction, and it was a lot of fun. 


IMG_1292


That’s the auctioneer at work.  It’s an odd profession.  But the items up for auction were so varied and fascinating!  I found myself singing “Portobello Road” in my head.   (You will watch the video and enjoy the dancing!  Now!)


“Portobello Road” from “Bed Knobs & Broomsticks”


Very unique individuals attend these events.  One particular gentleman bought a Vietnam era US Army uniform and then wore the hat for the remaining 2.5 hrs of the auction. 


IMG_1296


This guy was soon to be the bane of my auction experience.  More on that shortly.


First; my spoils.  A router table!  With a router!


IMG_1295


I won this for 60 bucks.  I’m pretty excited about this, as I’m planning to take my first foray into furniture construction soon, and this will almost certainly be a help. 


I also picked up a snapper riding mower, which you can just make out in this picture below.  I haven’t decided if I’ll be keeping it or not.  As my mom pointed out to me, I should try to buy something I can make money on and therefore pay for the tools I am keeping.  I can definitely turn a profit on the mower.

 IMG_1293


Also in the picture above is the band saw I went to the auction for.  I told myself I’d bid up to 50 bucks for it, and I expected it to go much cheaper.  It would have, too, if not for Captain Kreigsmarine, Bane of Auction Day.  He had bid against me on the mower, and he seemed upset that I won it.  The next item I bid on was the band saw, and he stared directly at me while he out bid me over and over.  I don’t think he even wanted the thing.  I mean, what does a guy wearing a 40 yr old Army hat who humps the air every time he bids (yes, that’s right) want with a band saw?!


Anyway, after he won the band saw, I paid for my spoils and went home to spend 30 minutes digging my trailer out of the snow it was buried in to go pick everything up.  Over all, I’m happy with my first auction experience, and you can bet I’ll be back.  With a wicked awesome hat.

Read More

November 13, 2010

This is the second post in a short series on our Entertainment Center.  You should check out part one first; Mounting a Flatscreen TV.   Today, I’m going to cover the contents of our Media Closet, how the various pieces work together, and how we control it all from the couch.

Disclaimer: If this makes it sound like we watch a lot of TV; we really don’t.  We do watch a fair amount of movies.  Honestly, the main motivation to do all this was monthly cost saving.  That, and fun factor.  I had a lot of fun putting it all together.

When we were touring this house, I noticed this odd door in the back corner of the Family Room.  It turns out it was full of shelves and had an outlet in it.  Perfect for a Media Closet!


020 022

This is the current state of it.  From top to bottom, we have:
  1. Home Server
  2. Wii and Media Center
  3. iPod Dock, Modem/Router, and Blu-Ray player
  4. A/V Receiver / FM Receiver and IR Broadcaster

Home Server
The server is an older computer I built for my wife a few years ago.  It’s now running Windows Home Server and has a couple of Terabytes of storage.  It’s supposed to come on each night from 0200-0600 to perform nightly backups of my computer, my wife’s computer, and the Media Center.  It still has some quirks; mainly because it’s older hardware.  I plan on updating it with some newer, low-power components soon.  Overall, I’m very pleased with WHS.  I don’t use many of the features it offers, but I do use TV archiving (explained below)

Media Center
I love the Media Center.  It is a low power ITX computer running Windows 7.  It uses Western Digital Green Drives, which spin less often and slower than normal HDs, saving energy.   The motherboard and CPU are also low power users.   The Antec MicroFusion case has an IR receiver built into the front of it; critical for using a remote to control the whole thing.  I’m using two USB HD tuners connected directly to an antenna on the roof, from which we get broadcast TV.  Cancelling our cable has saved us a cool $70.00 a month.
The Media Center boots directly into Windows Media Center.  Once there, we can access NetFlix streaming, Hulu, live TV, and recorded TV.  Since we have massive amounts of storage, all the shows we record get archived to the Home Server after we’ve watched them, unless we delete them first.  In this way, we’re building a library of past seasons of some of our favorite shows.  We also can browse our collection of pictures and listen to our music library.  The music library is shared by all the rest of the computers, which run iTunes and point to the Media Center box for their libraries. 

020

The picture shows my custom Autumn WMC theme with the Guide.  It’s all free, and easy to use. 

Whenever a camera is attached to any computer in the house, the pictures automatically go to the Media Center.  The same is true for buying music on iTunes or ripping a CD.  Because of this, the Media Center has to be available all the time.  This is why it is such a low power box… it is never turned off.  It has an HDMI-out port, which is how I get all this magic to the TV.

iPod Dock / Router / Bluray Player
Nothing too special, here.  The dock is to allow guests to hook up and play music, or ourselves to do the same if we don’t want to have to turn on the TV and browse the entire music library looking for an album.
I ran Cat5e (Ethernet cable) to the office, so that my computer, the Home Server, the Media Center, the Wii, and the BluRay player are all hardwired in.  Just the iPhones and the wife’s laptop are wireless.
The BluRay player can also access Netflix streaming, albeit poorly.  Once I upgrade the Media Center by adding a BluRay drive to it, I’ll be moving the player to a different room to allow us to stream Netflix to another TV.

A/V Receiver
I’ll admit it; this thing was pricey.  The Onkyo TX-SR608 is pretty awesome, though.  And, I needed a solution that allowed me to connect a lot of HDMI and Component devices to one source and output a single HDMI cable to the TV, as I had a long way to travel.  Going into the receiver is the Media Center, Wii, and BluRay player.  It also had the Cable Box before we cancelled cable.  We still have room for any future additions, too.  The output from the receiver goes into the basement, through the rafters, up into a wall, and out to the TV.  The DTS is amazing, and as we’re only using 5.1 channels right now, we still have 2.1 available for another room at some point in the future.  The subwoofer sits in the mini-closet beneath the bottom shelf.

How to Control it All
This one is actually easy to answer.  The Logitech Harmony 890.    I got a refurbished one for just over 100 bucks.  It’s worth it.  Without this, my wife would never allow the Media Center to be our primary source of TV, Movies, and Music in the house.  If she presses “Listen to Digital Music”, it turns on the TV and the Receiver, sets the inputs correctly, and loads the Music Library for browsing.  If she presses “Watch a Movie”, it fires up the Bluray player.  The software makes configuring the remote pretty simple.  The other big factor with this remote is the RF.  It broadcasts button-push signals in the FM spectrum, which are received by an FM receiver in the Media Closet, translated into the IR spectrum, and spammed out to all the devices.  This means we can have that closet door closed and change channels from the couch (or another room entirely) without any awkward over-the-shoulder remote pointing.

021

So that’s it!  I’m happy to answer any specific questions, and I’d love to see your Entertainment Center setups!
Read More

February 6, 2010

Blizzard.. or a Nor'Easter.  We've had both this winter, now!


Read More

February 2, 2010

DW was able to use the dishwasher today.  It was exciting.  It may be the only time I EVER get to say that.
This is our sink.  It's from Whitehall, and it's made of firestone clay, whatever that is.  It's huge, though.  And awesome.  Awesomely huge and awesome.

That's a wall cabinet I've customized to serve as a base for the farmer's sink.  For now, we're using our old faucet and sprayer that I've "installed" onto a 2x6.
The happy wife.
Read More

December 15, 2009


When we were going through the house w/ the home inspector, I asked him if I'd need a chimney specialist to determine if there was any degredation.  He looked up with the flashlight and said it looks remarkably clean.  Later, the owner told us that they had never used it.  Not once.  And they moved in in 1963.  Further, she said, the owners before them had never used it either!  Apparently, the house has cedar shingles at the time, and they were afraid some ember would start the house on fire.  Well, we'll be breaking that trend.


First, though, we've got to do something about that look.  White walls, white brick.  Who paints brick? 

After some online research (of course) I determined that sandblasting might be overkill for this, and it could damage the brick.  We wanted to avoid any harsh chemicals, as we don't like using them on principle.  We bought some citrus-based stripping gel and started with that. 


The citrus-based stripper

The carbon brush wheel

After brushing it on and letting it sit overnight, I attacked it with a scraper.  I got some chunks off, but obviously this was not going to get it out of the grit of the brick to the level we wanted.  So I bought one of these carbon steel brush wheels and a new Dewalt corded 1/2" drill to turn it with.  Oh, and a dual-filtered breathing mask, because this was going to put a lot of paint dust and brick residue in the air, and I don't want me or the wife breathing that in.  Oh, speaking of dust in the air...

I put a sheet of plastic from floor to ceiling to encase the living room.  It has a very ET feel to it.  "Elllll--eeeeee--ooooot?"

This was a good move.  There was a LOT of dust.


Stopped for a progress shot.  You can see where the citrus stripper has removed chunks of paint where the brush wheel hasn't been yet.  But the best part is, of course, that the wheel is getting the brick to the distressed look we are after.  Unfortunately, it's also wearing out that brush incredibly quickly.  We ended up going through 5 or 6 of them in total.  Once I had the technique down, I showed it to the wife, who is always sometimes willing to jump in on our ongoing projects. 


Read More
Powered by Blogger.