January 27, 2010

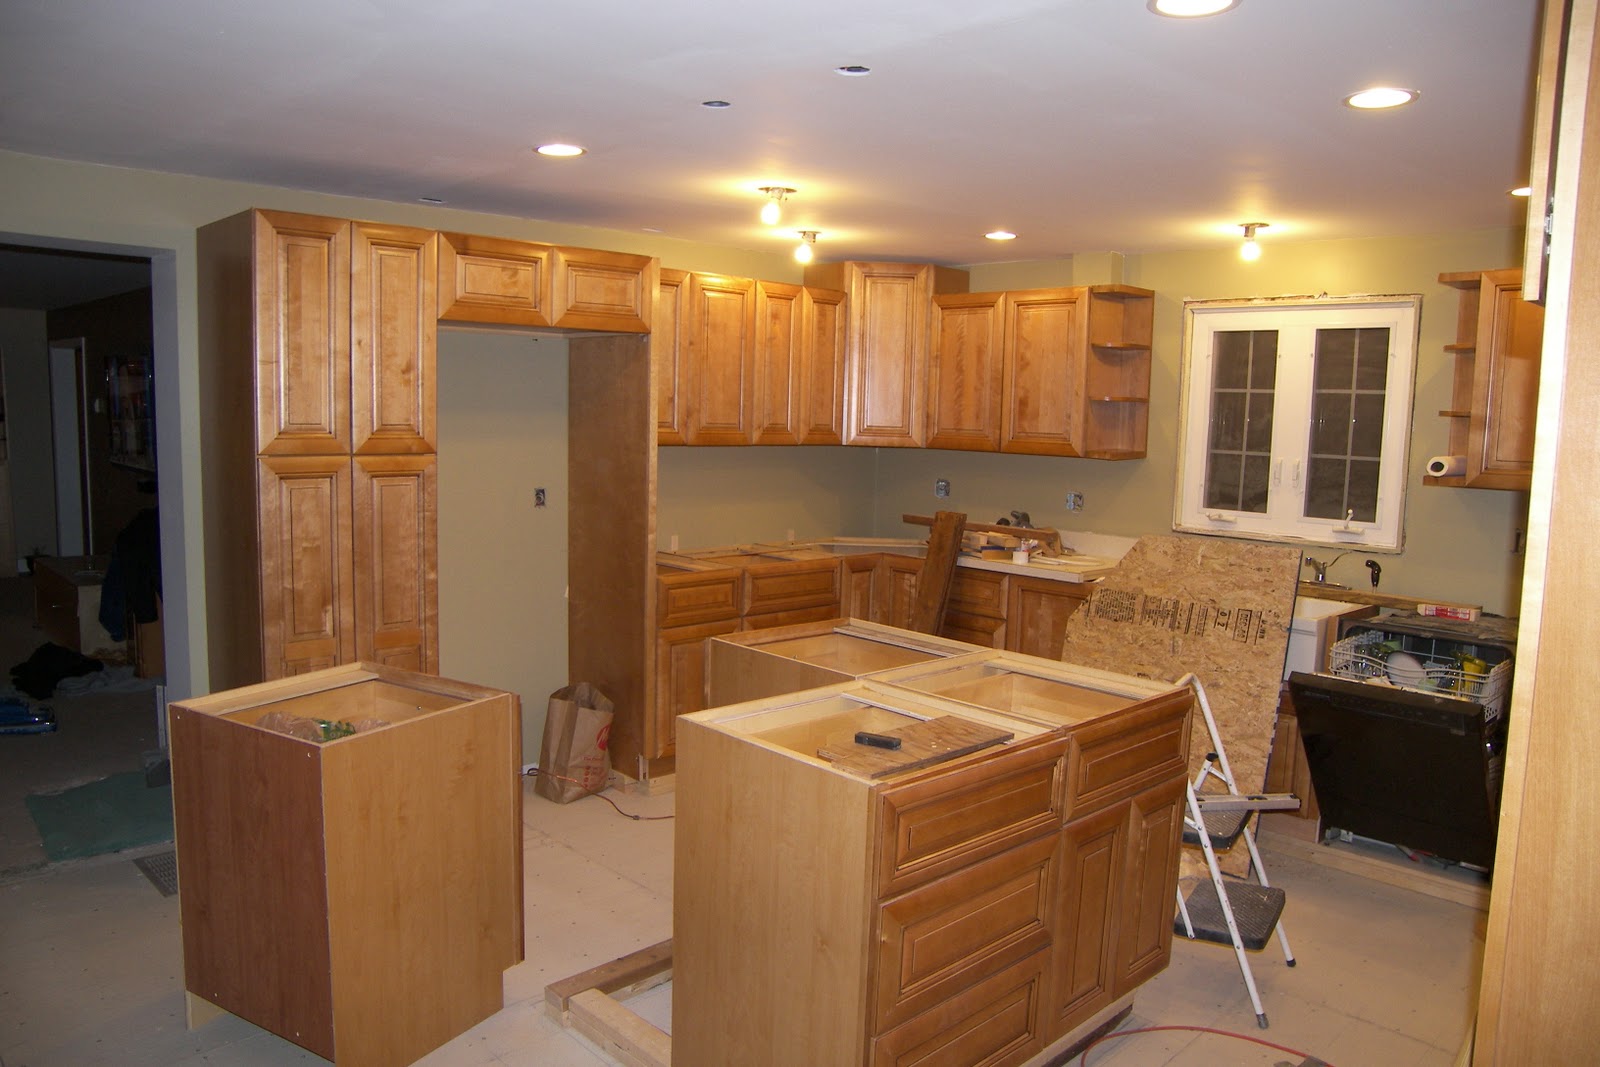
First cabinets go in! First up is the corner upper cabinets.  You have to do these first for pretty obvious reasons...

  1. You can't start at the end of the row because the corner likely won't fit correctly
  2. You can't start with the lowers first because it would make putting the uppers in far too difficult.


Here, we are carefully measuring the back of the cabinet for a couple of reasons.  Firstly, we need to know where to mount it to the studs.  What we did was to find the studs in the wall, measure from the corner to the middle of the stud, and then use the measurement to find that same place on the back of the cabinet.  Once we had it, we drilled some pilot holes.  Secondly, we measured for the hole to pass the romex through.  You can see it hanging out of the wall in the picture.  There are two strands; one goes into the corner cabinet for in-cabinet lighting.  Eventually, we'll be putting glass in those doors.  The second strand will go into the next cabinet over to feed a supply for under-cabinet lighting.  It's worth pointing out that I've put switches in place that feed each of these lines. 
Lessoned Learned: I should have put the strand for the in-cabinet lighting on top of the cabinet instead of inside.  Now I have to try to hide the hole.


Once all of the uppers had their pilot holes drilled, we installed the ledger bar. 
I read about this on the web.  Dad had never put in cabinets without a soffit before, and I had never put in cabinets at all before.  This ledger bar made the whole thing possible. Basically, put some 2x4's up on the wall at the correct height, and make it level.
Lessons Learned: Two on this one.  I should have focused more on making the ledger bar an equal distance from the ceiling instead of perfectly level.  Why?  Because it's an old house, and nothing else is perfectly level, no matter how hard we tried to make it so.  Second, I should not have gone so tight to the wall w/ the ledger bar.  It caused drywall screw heads to pop, and I have to fix them at some point in the future.

The ever-reliable Jessie and Jamie
We jumped a few days ahead here.  The ever-reliable Jessie and Jamie came over to help get some more upper cabinets in.  And now I get to share a little secret design idea of mine visible in this last picture.  We built a 2x4 base under the all of the base cabinets.  Since 2x4s are really 1.5" thick, and we stacked two of them, this gives all of our cabinets a 3" lift.  This is awesome!  Since all the men in my family are over 6', this was a no-brainer for me.  My wife, at 5'4", took a little convincing, but she was totally sold the first time she used the sink.   It was also great because we were able to run some PEX for the pot-filler over the stove and also the venting tube for the range hood.

Read More
The mudding is done, the sanding is done... today was paint day.  We did the ceiling first, and then kept right on going into the walls.  It's way easier right now before cabinets and flooring are in and we have extra stuff to paint around.


We'll need to do some touch-up work at a later date, but not for a while, yet.  Also, I'm still unconvinced on keeping the chair rail.  this may be a battle not worth having.. I'm not sure.  Husbands know what I mean.

Read More

January 24, 2010

 Drywall is up!  Wow what a difference it makes.  In truth, I feel the room is small right now, but the math side of my brain knows better.  I'm not sure why the drywall does that... is it just me?

It's so good to have it up.  Electric is in, lights are working.. it feels like a room. 


Let's not rest on our laurels, though.  Time to start mudding.  Dad hates mudding.  But he's really good at it, and so he ends up doing it a lot.  But, seeing as how the budget doesn't have room for someone else to do it, it's him.


Wow, I'm just noticing how the old color, when next to the new drywall, looks even more gross than it did previously. 

Dad was a rock star with mudding.  I didn't have to do anything but sand on this project.  Lots and lots and lots of sanding.  He's rightfully proud of knocking this all out in a pretty short time frame.


Read More
The old range hood used to vent out the back of the house, but when the previous owners added a sunroom, they just built a drywall encasement for the vent and vented it horizontally along the now-interior wall of the sunroom and then out a hole next to the door.  Dad decided this was no good, so he put a new hole in the side of the house, and we're venting it down the wall, under the cabinets, and out that hole.
Too fun to pass up

We always knew he would fall for a machine.  We thought it would be a vacuum, though.

The finished vent
Read More

January 23, 2010


I really went back and forth on whether or not to do this.  But I decided, what the heck, I'm never gonna have another chance to put this in.  I'm adding hydronic radiant heating to the kitchen and getting rid of the baseboard heat.
A lot going on, here.  We moved the A/C ducting hole over to be under the island.  We also put in subflooring to fill in where the old cabinets were.  Lastly, against the wall, is the beginning of the border where the radiant will stop

Here's where I started.  Each run of PEX is 8in on center.  The whole thing will add about 3/4" to the height of the kitchen floor, but it will be totally worth it.

This is actually cold-water PEX I have for another project, but I'm using it here just to test out my theory to make sure it's all going to fit.  Those aluminum pieces are to distribute the heat into the hardibacker when it goes in.  I bought them un-bent and I'm using that metal piece of conduit and some 2x4s to bend them into shape.


Father-in-law stopped by to check out my flooring progress.  It's coming along nicely.  I really freakin' hope I don't put a hole in this tubing.
If I had to do this over again, I'd order twice the amount of aluminum plates I did.

Read More

January 21, 2010

With some help from friends Jamie and Jessie, Dad and I put in the new ceiling tonight.

We used a dremel and a special bit to cut out the openings for the can lights.  It works very very well, but you will go through some bits doing it.

Let there be LIGHT!
Read More
This job was awful.  Possibly the worst part of the whole remodel so far.  The tiles just wouldn't come up.  I rented a jack hammer and my Dad and a friend Eric worked at it all day while I was at work.  When I got home, 30% was still left, and it took me till very late to get that off.  I don't think I took many pictures of that part.  It was too frustrating.


The next day I rented a belt sander used for restoring hardwood floors and used it to get all the old grout off the floor.  That was another big project.


Lastly, I used floor leveling compound on all the holes and gouges we put into the subfloor using the jackhammer and let that dry over night.
Read More
These things are stupid expensive because they are sold in two parts.  I was quite annoyed.  I think Dad and I argued about where to place the lights for about 2 hours total.  He had some good insight about placing them where they are the most functional.  If you know my Dad, this is not surprising to you.  I wanted them in nice straight lines and symmetrically placed.  We ended up with a bit of both, I think.


That box there is for the future pendulum light above the island
Read More

January 20, 2010

Dad framed out the new entryway today.  Recall that this used to be a narrow, short hallway with a closet.  He used about half of the lumber that Howie left me... there is a LOT of wood in this thing.  I can't wait to see it drywalled.
Read More
She's totally gutted, now.  Pictures speak better than me for this one. 
Notice that metal vent pipe to the right of the window?  Totally unused and completely rotted.  It will come out.

I ended up removing all the electrical later and starting over

There's a wall behind the walls in this room.  And a ceiling over the ceiling, too.  That wonderful color scheme there is the original wall.

Taking out the closet has really changed the flow of the whole first floor.
Read More

January 19, 2010

First; a quick note about the "Living Room.".  It's not one.  It's a Family Room.  But my wife insists that it's a Living Room and that the room w/ the TV in it is the Family Room.  Ok, fine.  I often go w/ "Fireplace Room" and "TV Room", but it doesn't have a nice ring to it.

Anyway, Aunt Debbie came by and helped DW paint while Dad and I worked in the kitchen.


A Baltimore tradition.  A gross one.

First fire in the fireplace!
Read More

January 12, 2010

I had to look up how to spell "soffit".  Spell checker keeps telling me it's wrong.  Anyway.... the soffit around the kitchen can't stay.  There are a few reasons for this.
  1. It's ugly
  2. We need the space.  Our cabinets will be higher up, and therefore we need room to grow.
  3. All the can lights are in the wrong places, and once we take them out, there will be holes.
  4. It's ugly.
A corner of it was already destroyed when we took out the old oven cabinet.  Time for the rest to go.  Not much explanation is needed here.  Basic steps involve grasping a hammer, swinging said hammer repeatedly, yanking down on remnants until they fall upon you.


Dad taking out the clock plug
   I found that these old style can lights each have a buried box.  Yikes.  Glad I'm getting rid of them.  They are sturdy, thick aluminum, so I'll be putting these into the recycling bin. 


Now that the soffit is down, we have a lot more debris to deal with.

That pile got so big, I started a base camp. 
Read More
Powered by Blogger.