February 22, 2011

A while ago, I blogged about my design for the corner storage bench I’m building for the Sun Room.  This weekend was a three-day weekend, and I started building it.  The unit is made up of three sections; 2 benches and the end piece.  I’m starting by making the plywood boxes that are the primary component of the benches.

Graduation Party, Aquarium 147

This is how I decided Dad told me to rip the plywood.  I considered using my table saw, but ripping a 4x8 sheet by myself just didn’t seem doable.  I called my Dad and asked him how he would rip it, and he told me to do it this way.  His tone of voice made me think that this was the only way to do it, and I probably should have figured that out.  Which, come to think of it, is probably true.  Basically, lay the sheet on something to prop it up, clamp down a guide piece, and run the circular saw down the length (after making sure the blade depth won’t hit the floor, of course).  Speaking of circular saw….


Look what I got! 

This thing is awesome.  It’s the Makita 5007MG Magnesium 7-1/4-Inch Circular Saw.  I bought it at Home Depot because I needed it quickly; it’s a few bucks cheaper on Amazon.  It’s light-weight, has a work light, and it rips like the wood is butter.  Oh man, did this make a difference.  My old mid-80’s hand-me-down Craftsman saw was great for the price (free), but it doesn’t hold a candle to this one.  I called Dad about this, too, and asked him which saw to get.  “Get mine.  Nothing better.  I love it.”.  Ok, that was an easy one. 

After I ripped all the sides and bottoms for the two benches, I wheeled out some of my cabinets as saw horses and started sanding.  And sanding.  And sanding.

Storage Bench Construction 007
  Storage Bench Construction 008

Dani took these shots, so I was actually in a picture for a change.

Once everything was cut and sanded, it was time for assembling the first box. 
Graduation Party, Aquarium 162  Graduation Party, Aquarium 163

Above, you can see how I used a straight piece of 1x4 and some painters tape to make a nice 3/4” strip where I’ll be attaching one of the sides.  The tape will protect the wood underneath from the wood glue oozing out of the joint.  Nobody likes oozing joints.

Graduation Party, Aquarium 166

After a lot of gluing, clamping, and screw-gunning, all four sides are now attached.  But wow, what a sag!  This isn’t supposed to happen with plywood!  I need to be more careful when I buy the wood next time.  I called Dad and asked him what to do.  He said “plywood isn’t supposed to sag; be more careful when you buy the wood next time”.   Thanks, Dad, I’ve already reached that conclusion; now what?  He advised me to weigh it down overnight.  I flipped the whole thing the other way around and put some big heavy bags of concrete mix on each side to hopefully counter the bow.  The next morning, I took the bags off and there wasn’t much of a difference.  I put the bags back on and glued/screwed on the base anyway, and it seems to be holding the bow in check. 
Graduation Party, Aquarium 170  Graduation Party, Aquarium 171

After the bottom was attached, I used my planer to even out any inconsistencies, and then attached the back lip piece, which is just a 8ft 2x4 that I sanded down.  I started the second box, too, but I ran out of screws, so it’s back to the store for me tomorrow.
Read More

February 21, 2011

Ok, we’re continuing the tour of the first floor.  If you haven’t already, check out the first in my house tour series; Episode IV: A New Home.

Sorry this post was a little longer coming than I originally suggested, but this week the handy hubby decided to start a project that we have no time, money, or patience for, and is in no way related to our home.  It involved buying a well-used (i.e. P.O.S) VW Beetle.  I’ll let him tell you the rest of that story.  So that took up a bit of our time, recently. 

But back to the house. Today, we’ll finish the first floor with these rooms:
  • Kitchen
  • Sunroom
  • Office

The Kitchen

This is the one room in the house that is definitely an after picture.  As you know from previous posts this room has been gutted to the studs and rebuilt.  Having this room almost completed has actually changed my opinion of the entire house.  Believe it or not, I did not love this house when we bought it.  However, Kevin did, and I was tired of looking, and I have to admit it met all of our requirements.  So why was I not in love?  I couldn’t tell you.  I just didn’t get that warm fuzzy feeling. 

But now… how could you not get warm and fuzzy about this!
069

The doorway in the left of this next pic leads to the sunroom.  The window overlooks the drive way, which is why, as Willow is demonstrating, it is one of the dog’s favorite spots.  The girls frequent the spot to growl at the wind or try to scare away the mailman. 

071

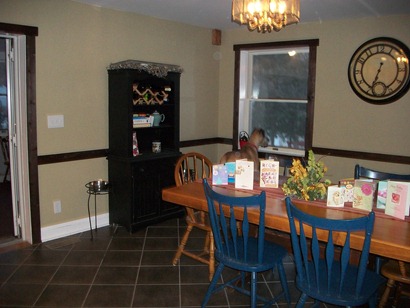
The doorway in the corner leads to the office.  Things that will eventually change is the ugly brass 1980-something chandelier.   Also the dining table that I inherited from my parents (and is a favorite from my childhood) will move into the sunroom to go with the bench seating.  The mismatched chairs will go in a yard sale.  The color of the room is Mochachino by Behr.

072


The Sunroom

This is easily my favorite room in the house.  It is very poorly insulated and three of the walls are old crappy windows so its not very pleasant to be in during winter.  In the summer, though, it is a whole different story.  I throw all the windows open and stretch out with a book; all the pleasures of the outdoors with all the luxuries of the indoors.  And no pesky bugs!  Anyway, you get how a sunroom works; I digress.
The room was previously the yellowy/off-white color you see on the doors.  Recently I painted the trim an ultra bright white and the walls are Secret Passage by Olympic.  We are going to replace the doors and strip the paint off the brick wall.


074

The bench seating that Kevin is working on building is going where the TV cabinet is, and the cabinet is being sold.  Also, we would like to replace the ceiling that looks like aluminum siding with natural wood so it has more of a porch feel.  Kevin wants new floors in here, and I admit it would look better, but the dark-color, rough berber carpet is perfect for the dogs coming in and out.  

Can you tell who's the Jedi and who's the Sith? 
075

Here’s a hint.


And the answer is:
danes_jedi

The Office

The original owner of this house built this room above the garage and originally had only an outside entrance.  It was his home-office for his building company.  The streets parallel and perpendicular to ours are named after him, and most of the houses closest to us were built by him.

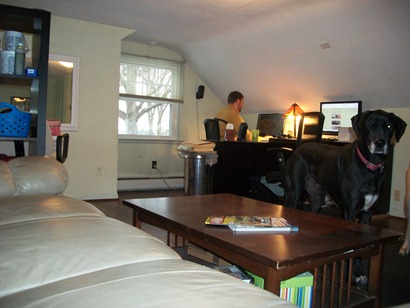
For us, the room houses our computers (i.e. blogging central)  and my home salon area for family members I love enough to work on my days off for.   Koa frequently comes in here to nudge Kevin with her nose for no other reason then wanting attention.  Kevin acts like it bothers him but secretly he wants the attention too.  You can see the paint swatches on the corner of the desk; they are evidence of another project coming. 

099

There is a closet next to the window that Kevin wants to cut into to make a built-in shelf.  It will mimic the line of the ceiling on the other side.  Then, the salon chair will swing around and the mirror will go on the wall where the current cubby shelves are.  The bachelor couch will go on craigslist and I will start hunting for some armchairs. 

100

And that concludes the first floor of the house!  We’ve got one more post yet in this series, which will cover the second floor.  I’ll be back later this week eventually with the conclusion:   Episode VI: Return of the Eighties.

See you then!
Read More

February 13, 2011

Hey guys!  “Darling wife” Dani here to give you a tour of the house.  I figured this would be a good introduction to the world of blogging for me and a good introduction to me for you, because this tour will take a few posts.  Also, I was thinking this way, when Kev writes about a project in the fill-in-the-blank room, you can picture exactly what's going on. 

Most rooms are in a “before” state, here.  While many of them have a fresh coat of paint or some other small projects completed, we’ve a long way to go, yet.

image

This is what the front of the house looked like the day we moved in. It no longer has that weird deck and wheelchair lift.  Oh, and those bushes are coming out this spring whether Kevin likes it or not.

Kevin and I often joke about what we would name our property if it were an estate and not simply a house.  Names like “the Sanctuary” or “Misty Farms” don’t quite fit.   Since we are on a rather large hill, Kevin likes ‘Mount Olympus‘ and likes to imagine himself Zeus.  For now, I’m just going to go with…

Welcome to our Home.


Today, I’ll take you through these rooms:
  • Family Room
  • Living Room
  • Half Bathroom


The Family Room

When you walk in the front door, you’re facing the stairs to the second floor.  The main floor is split in two by the staircase; with  a living room on each side.   This first room we call the Family Room because it is the more casual of the two and also has the TV.  I wanted really simple paint colors in here, so we went with Belgian Sweet Chocolate by Behr on one wall and Classic Taupe by Behr on the rest of them.  The next project we are planning in this room is hardwood floors.  Then, I’ll get to go crazy picking out colorful furniture and getting rid of some of our early-marriage Ikea pieces.  

051

068


The Living Room

On the other side of the stairs is the Living Room, which still gets confusing so sometimes it’s called the fireplace room or, if Chicago relatives are in, the “frunchroom” (don’t ask me, you have to be from the midwest to get it).  After stripping the paint from the fireplace, the exposed brick and stained wood trim felt very colonial to me, so we went with colors that continued that feel.  Silent Tide is on the wall with the fireplace, and the other walls are Artic Ocean; both by Behr.

064

065

This room is a total hodge podge collection of furniture.  Most items I bought very spur-of-the-moment with the thought, “I’m tired of the room being empty.” or, “ I just want something to sit on by the fireplace.” Both love seats were a Craigslist purchase and the arm chairs were 50 bucks for the pair at goodwill (and they had slipcovers so they were super easy to clean). The rug was a floor model at Home Depot and was discontinued, so I got it for super cheap (50 bucks!  I just have to figure out how to get the sticker off). 

067
  066


The Half Bathroom

This is the half-bath on the first floor.  The paint color is Cherry Cobbler by Behr.  For such a small room, the painting took a long time.  I painted on the matte first, then measured out and taped the diamonds onto the wall, and finally went back and filled in the diamonds with the glossy paint.  Now that I see the final result, I think it was definitely worth all the effort.
 089

Later this week, look for my next post, Episode V: Great Danes Attack, in which Koa and Willow adventure through the rest of the first floor.

What do you think of my first post? 

What would you name your estate if you had one?
Read More

February 8, 2011

As I mentioned in my last post, I’ve been tying up some loose ends in the kitchen recently, which has freed me to start a new project.  My wife, Dani, has asked me to make a corner storage bench for the sunroom as a birthday present to her.  This is a bit of a sneaky move on her part, because she’s wanted one of these for a while, but by asking for it as a birthday gift (admittedly a belated one) she’s managed to bump it to the top of the projects list.  She’s a wily one.


She recently repainted the sunroom, which I think she’s going to do a post about.  We’d both like to see the room put to use other than as a temporary kitchen or a tool storage area.  The room is a bit awkward, because it serves as the primary entrance to our house, but it’s supposed to be a relaxing room. 


We’ve decided to put a rather large corner storage bench in the…well..the corner.  We think it will look great, and it will be very functional for things like parties and holiday dinners.


IMG_1333


That’s the corner we’ll be putting it in.  The room is in a state of disarray as it’s just been painted.  If you’re quick enough to notice that there is a chainsaw at the door and snow on the ground outside, it’s because we lost some branches from the recent snow storm, and I need to go out there and take care of it.  I placed the saw there this morning hoping I’d be motivated to do so…. yeah, not so much.


I’ve been playing with Google SketchUp recently.  It’s a very nice 3d modeling tool for designing just about anything; and it’s free.  It has a bit of an initial learning curve, but after I got the hang of it I could do some pretty cool things.  I used it to design the bench seat.  Here’s the design as it exists right now.


image


image


The higher end-piece there has cubbies for shoe storage.  If you look closely at the first picture, you can see that the far left end piece has a notch in it.  That’s to accommodate the baseboard heater that you can see in the picture of the corner we will be putting this in.


This past weekend, I went to Home Depot and dropped a lot of money for the supplies and tools that I needed to build this thing.  Probably about the same amount of money it would have cost to buy one from the Amish Market, but at least I’ll have the tools and learning experience to take on to my next project.


So hopefully sometime this week I’ll get started on this.  I need to sit down and bust through our taxes first, though.

Read More

February 6, 2011

I don’t really like to curse.  I can usually avoid it.  Today was not one of those days.  I hate hate hate replacing old 3-way switches.  It took me 2 hours to figure out how to do it right.


image

image


image


I’m no dummy, but the fact that the “hot” wire can also be the wire that signals the other switch is still very confusing to me.  I reread what I just wrote and it still doesn’t make sense.  The blue diagram actually helped me figure it out, and after 37 trips up and down the steps to go flip the breaker, I finally got it installed.  Two hours later.  [sigh].


So here’s some shots of the installed outlets, switches, and covers.


IMG_1330  IMG_1332IMG_1331


You might notice the messed up paint under the one switch.  This, people, is why you never:

  1. Put wallpaper over a switch
  2. Paint over the wallpaper


I have my previous owners to thank for that one.  Oh well, more painting to do.


Now that I’ve wrapped up these loose ends, it’s on to new projects!  Stay tuned.

Read More

February 3, 2011

We’ve been on-again-off-again with P90x.  It is an intense workout.  This is not Jane Fonda.  Tony Gazelle’s calves won’t help him.

This totally looks like a natural movement


A good workout with p90x leaves me feeling very worn out and sore the next day.  But this week’s big project had me feeling a lot worse.  I finally… finally… put trim in the kitchen.  There was a lot of work while squatting, crawling, on knees and elbows, etc, that left my body quite unhappy. 

First, a few shots to show what we’ve been looking at every day for the last year.

IMG_1230  IMG_1235

I’ll leave out the windows.. you get the idea. The first thing I needed to do was to replace some 1/4in entryway framing that was done poorly the first time.  The wood used had a lot of voids in it, and this caused surface cracking over time.  Here’s what I pulled out.

IMG_1233  IMG_1234
After measuring for the replacements, I ripped a higher quality sheet of plywood and sanded, primed, and painted them. 

IMG_1263  IMG_1269

I used my finish nailer to put them in, and then moved on to the trim.  I decided to go with stained rough-hewn cedar boards to really bring out the rustic theme we’re aiming for.    I picked out a few stains to choose from.

IMG_1222

We went with the middle one; Red Mahogany.  The Ebony one on top was too dark, and the bottom one was too close to the cabinet color.  Our choice matches closely to the accent color of the cabinets, so I think it works well.  I set up shop in the garage, because all the snow in the yard makes it difficult to traipse back and forth from the house to the barn.  Staining was easy and fun.  After applying the stain, I wiped it off again with a rag to let some of the grain come out. 

IMG_1240  IMG_1241

Once I had all the trim for the windows, doors, and chair rail cut, stained, and installed, I had to make the baseboard.  I wanted to match the original baseboard in the rest of the house, so I had to make it using 1x4 pine boards, some top molding, and quarter round.  This required a lot of cutting, priming, and painting.  I mitered the corners using a compound miter saw, and I’ll admit to having to do a few of them over again as I learned when to cut on the line and when to cut next to it.  That 1/8th of an inch the blade takes out really makes a difference some times.  I went with white on the baseboard so that it would go with the windows/doors, and provide some consistency from one room to the next.

IMG_1280  IMG_1284

After all the trim and baseboard was stained/painted and installed, I went back with some Elmer’s Wood Putty and filled in all the nail holes in the baseboard before putting a final coat of Ultra Bright White on it.  I also touched up the green on the walls as well as the windows and entry ways.  Once everything was put away I was amazed at the difference it all made!

IMG_1310

Oh, I also sanded, primed, and painted that closet door and put on some new oil-rubbed bronze hinges to match the cabinet hardware.


Check out a before and after:


IMG_1230IMG_1310


IMG_1308

IMG_1309

There is still much to do in the kitchen, but it really feels like a finished room, now.  This week’s task is to replace all the outlets and switches and get them covered.  And I guess I should clean the floor, too.

Read More
Powered by Blogger.